

how to change brush size in krita
Tutorial: Hatching, Grid, Spray and Experiment brushes
This tutorial covers brushes that all render shapes of some sort.
Hatching Brush
When I first tried this brush, my impression of it was "plain parallel lines" (and the award for most boring brush goes to...). Fortunately, existing presets gave me an idea of the possibilities of this brush.
Settings
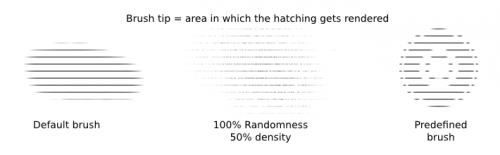
Brush tip
The brush tip simply defines the area where the hatching will be rendered.
- Transparent brush tip areas give more transparent hatching, but as with a normal brush, passing over the area again will increase opacity.
- The hatching itself is mostly fixed in location, so drawing with a hatching brush usually acts more like "revealing" the hatching underneath than drawing with brushes of parallel lines. The exception is for with dynamics on.
- Vary the brush shape or texture for a variety of effects. Decreasing the density of the autobrush will give a grainy texture to your hatching, for example.
- The dynamic affects the brush tip, not the hatching thickness.
Hatching preferences
Before going on: at the time of this writing, there is a bug that causes line thickness to not vary on default settings. To get around this, go to and check . Pentalis is aware of this issue so the bug may get fixed soon. ![]()
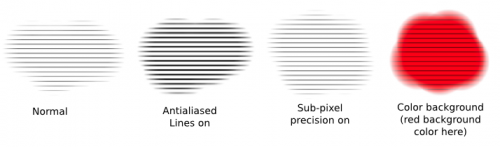
The three options are:
- : This controls aliasing. If changing line thickness isn't working, check this option and it should work, because it switches to a different algorithm.
- : I'm guessing this affects the rendering quality, but you won't see much of a difference. Check this if you want to.
- : Checking this will color in the background at the back of the hatching.
The output is slightly different depending on whether the first two options are checked, but the difference isn't enough for you to worry about. I recommend just keeping the first two options checked.
Hatching options
This is where the main hatching options go. They're intuitive enough:
- : The angle of the hatching.
- : This is the distance between the centers of the lines.
- Use a value of 2 pixels or higher, or the lines won't be distinct anymore.
- The Separations dynamic doesn't actually assign random values to Separation, instead it will take the value in "Input-based intervals" to divide the grid further. "Input-based intervals" can take values between 2 and 7.
- : The line thickness.
- Actually, this is the thickness of the line + blank area, so the line itself has a thickness of half this value.
- If you use the same separation value and the same line thickness value, then the lines and the area between them will be of the same thickness.
- You can vary this value dynamically with the Thickness dynamics.
- If the line thickness isn't changing for you, go to Hatching Preferences and check "Antialiased Lines."
- and : The hatching has a fixed location, painting acts as though you're revealing the existing hatching underneath. To nudge the hatching, you can tweak these two values. You can get various grid effects this way.

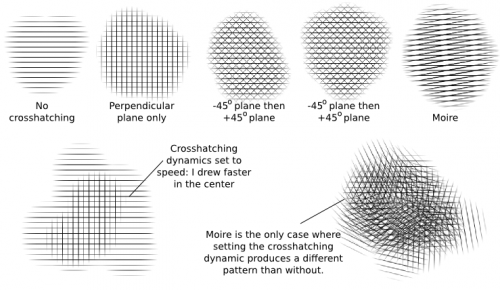
Finally, we have the hatching styles:
- : basic parallel lines
- : grid lines
- : see example.
- : see exampe, actually not much different from the above, it's mostly the order that changes when using dynamics.
- : See example.
The dynamic only works if you have already chosen a crosshatching style. When that happens, the crosshatching only gets drawn according to the conditions of the dynamics (pressure, speed, angle...).
- With most hatching styles, using crosshatching dynamics basically gets you the same hatching style, minus the occasional line.
- The exception is with Moire, which will produce a different pattern.
Use cases
If you don't want the edges to be fuzzy, go to and set the values to 1.00. I recommended doing the hatching on a separate layer, then erasing the extra areas.
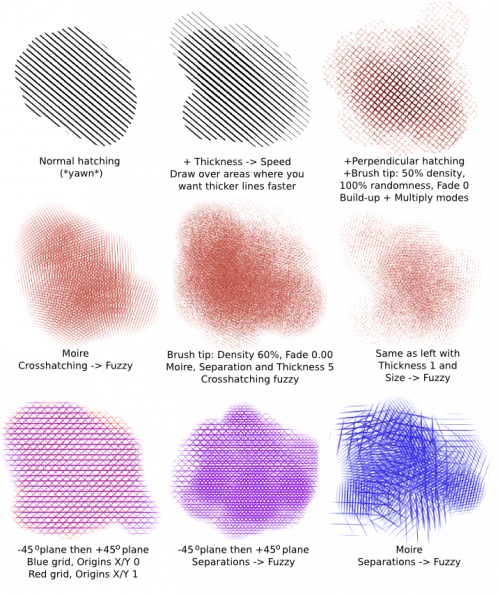
Now for the uses:
- You can, of course, just use this for completely normal hatching. In versions I'm using, the default Separation is 1, which is too low, so increase to a value between 2 to 10.
- If you find normal hatching too boring, increase the and set the dynamic to either (if you have a tablet) or (if you're using a mouse). Doesn't that look more natural? (When using a mouse, pass over the areas where you want thicker lines again while drawing faster)
- Grittier texture: add some density and/or randomness to your autobrush for a grittier texture.
- You can also set to , and to , to make some colors have more depth. (see my grid example)
- Vary and while using the same patterns.
- Use the dynamic for more complex patterns. Add in Line and other dynamics for more effect.
- Now, the is quite boring on its own, but it is much more interesting with dynamics set on .
- For more texture, set Line to , decrease a bit and increase and you get a nice gritty texture.
Grid Brush
The grid brush produces pixel art and other patterns (referred to as Particles here) within fixed grids. LukasT also has more information.
Like with the Hatching brush, the pattern rendered by the Grid brush is fixed in location, so your grids will always be properly aligned. Unlike the Hatching brush, you don't have Origin X/Y values to nudge the grid, but then again, unlike with hatching, you don't really need to nudge a grid.
Settings
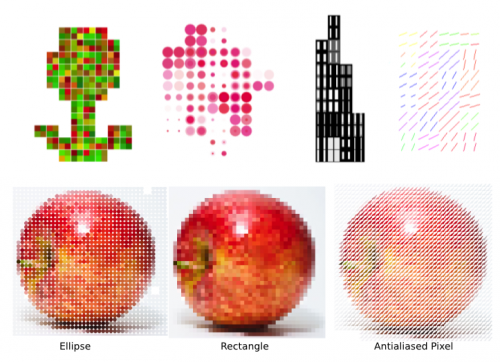
Particle type
The grid brush actually allows you to produce 5 particle types. In select one of:
- : actually, this produces antialiased lines. You see the difference if you zoom in.
- : see examples.

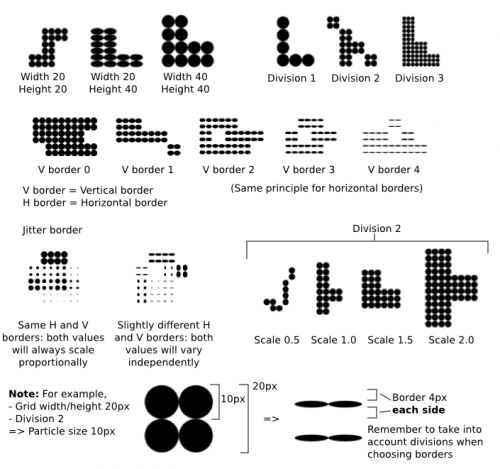
Brush size
This tab allows you to control the size of the patterns:
- and : these determine the dimensions of a single grid, in pixels.
- This value can be controlled from the canvas with Shift + drag.
- : divides a grid into subdivisions of particles (example: division 2 gives a 2x2 pattern)
- : This is a tablet-only option. With this on, the number of particles per grid depends on your tablet pressure.
- : Scales the grids by multiplying the number of particles.
- The number of particles per grid will basically be X * X (X = Division level * Scale)
- and : Remember that the grids are fixed. What these do instead is further squeeze the individual patterns within a grid.
- : This will vary the border randomly between 0 and the value set.
- If Vertical and Horizontal borders have different values, then the X and Y borders will vary independently.
- If they're the same value, though, the X and Y borders will always vary proportionally.
- To get around the above feature, make the values differ just slightly, such as 2 for Vertical and 2.1 for Horizontal for example.
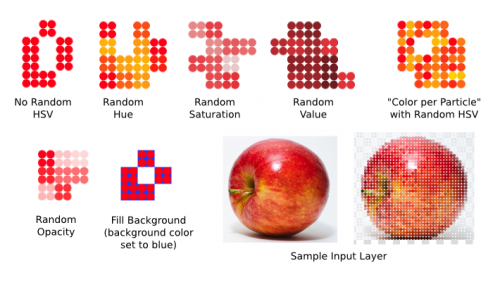
Color options
Finally, you have a Color options tab, where you can find:
- : These control the range for Hue, Saturation and Value.
- : Controls the range of hues (red, blue, green...).
- : A negative range will cause color to become more grey, whereas positive values cause greyish colors to become more colorful.
- : The color's lightness or darkness, basically.
- : This will cause each grid to vary in opacity. Note that although this is placed over the 4 options below, they are all independent options.
- : Normally all the patterns within a single grid will take on the same color. If you have this and Random HSV checked, though, each particle within a grid will vary independently.
- : The square behind the particle will take on the background color.
- : This will cause the particles to take on the colors of the input layer! To use this feature:
- Have your photo or picture ready in Krita.
- Select that layer, and switch to the Grid brush.
- Turn on . The sampled layer will be the one chosen when this option is turned on. Note that transparent areas will be rendered as black particles.
- Turn off the visibility of the sampled layer. Once it's sampled, it doesn't matter if it's visible or not, and if you leave it visible, you won't see your grid result so clearly.
- Switch to another layer and draw with your grid brush.
- To cover areas faster, increase scale and turn on .
- : This is a tablet-only feature that mixes the particle color with the background color according to pressure.
Use cases
- Of course, the Grid Brush is perfect for all your Pixel Art needs.
- I also once came across a person who used this brush to make stitching designs!
- By messing with borders and HSV, you can also create a variety of patterns.
- Speedpainting windows? Turn on , adjust grid dimensions, mess with border values and turn on jitter borders.
- And of course, you can use this to convert any picture into pixel, dot or other types of grid art! Please refer to the Color Options section again to see how to properly use this feature.
It's pretty easy to figure out the settings for this brush, so I'll just leave you with some pictures as examples:
Spray Brush
The spray brush can be used to spray several different types of shapes onto the canvas. LukasT has more on this brush here and here.
Settings
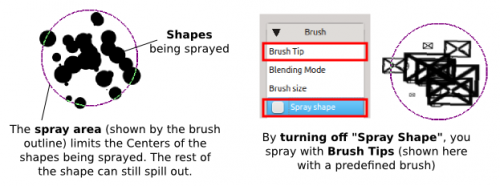
A few terms first:
- Spray area: When I say this, I'm referring to the area shown by the brush outline (which you can turn on in ). This area only limits the Centers of shapes being sprayed. The rest of the shape can still spill out. You control the size of the Spray area from the tab.
- Shapes: These are the actual objects being sprayed, and is equivalent to "Particles" with the grid brush. You actually have two options:
- Spray shape: With checked, the Spray brush will render specific shapes to spray depending on the option. This is on by default.
- Brush tip: To use this option, uncheck . This will allow you to use any normal brush tip as your spray shape.
I'll cover them more in-depth in their respective sections.
You may be confused about what goes where, so here's an overview (not given in order):
- : This controls the placement of the shapes, but does not affect the shapes themselves. Placement includes spray area (and the form of the area), number of shapes being sprayed and distribution type.
- , : These dynamics affect the spray area (so basically, they correspond to options found in Brush size), not the spray shape.
- : This allows you to generate shapes to be sprayed, and specifies the dimentions.
- : This will allow you to choose the shape to be sprayed if the option is off.
- : These include size and angle dynamics for the shapes.
- : These control the shapes' color dynamics.
- : Using this will cause the spray brush to keep spraying shapes as long as you hold the button down over an area.
Spray shape
Spray shape option
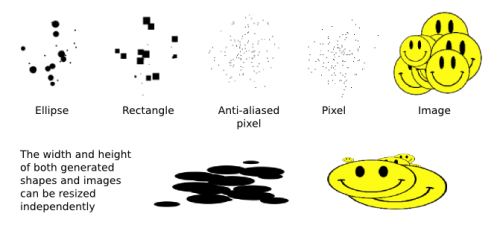
Let's start with the option on. You then have 5 Shape options:
- : anti-aliased pixels are less sharp than plain pixels
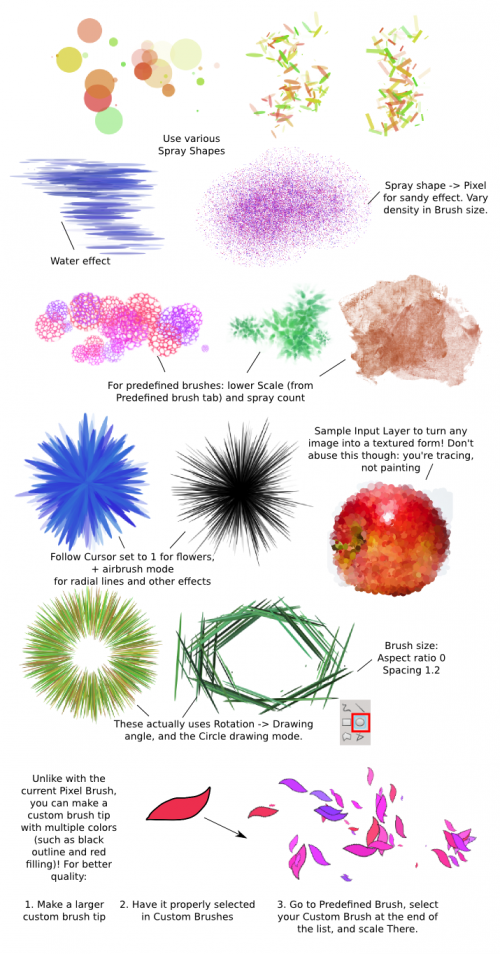
- : Pixel and Anti-aliased pixel can be used for sand effects
To spray an image, choose , go to the line below and choose a file. Spray shape can use:
- Common image files such as .jpg, .png, .gif etc. Remember that .png and .gif can have transparent areas, but .jpg will always have solid backgrounds, which may get in the way when spraying.
- .xcf (Gimp file) or .psd (Photoshop file)
- At this point, this option can only spray static images, not multi-layer ones. If you use an animated gif or a .xcf file, it will only spray the first layer.
- If you want to spray animated images, you will have to use the other option: spraying Brush tips, by turning off.
To change the shape sizes, just change the and (W and H for short).
- Clicking the chain on the right will cause the values to vary in a proportional manner. For example, for W = 25 and H = 50, dragging W to 50 will cause H to become 100.
- The checkbox will cause Width and Height to be dependent on the size of the spray brush.
- At 100%, the shape will have the same width and height as the spray brush, adjusted for ratio, but not for angl
- This is handy because Shift + Drag normally varies the size of the Spray area, not the shapes it sprays.
- You can't change the size of Pixels and Anti-aliased Pixels. By definition they will always be 1px * 1px
- When you choose an Image, the Width and Height values will automatically take the dimensions of the image file. You can change them however.
Brush tip
By turning off, the Spray brush will use the Brush tip instead! I have extensively covered the Brush tip options in my Pixel brush tutorial, so please read it again for all the different options. In particular, you can use animated brushes (.gih brushes) as brush tips here!
There are several behaviors to be aware of:
- Brush size: The Shift + Drag shortcut resizes the spray area, not the sprayed shapes. By default, the Spray brush will use the default size of the brush tip selected. This default size is usually quite big, so:
- For Autobrushes: scale manually by controlling diameter.
- For Predefined brushes: scale manually with the value in the predefined brush tab.
- Angle and spacing: These can also be controlled from the Brush tip tab.
- Particle count: With the pixel brush, each click leaves one copy of the shape. With the spray brush, the default number is 12, which can be a problem for:
- Density: if you're using a big pattern, spraying 12 at a time may be messy, so decrease the particle count.
- Color dynamics: Each spray instance will use the same colors for shapes sprayed. To vary them individually, check in the options.
- Color variations for color images: The tab allows you to choose a variation range for , and . With the Pixel Brush, you currently can't vary these for a brush tip with multiple colors, but you can with the Spray Brush! The Spray Brush will act as though you're applying HSV filters to each shape.

Brush size
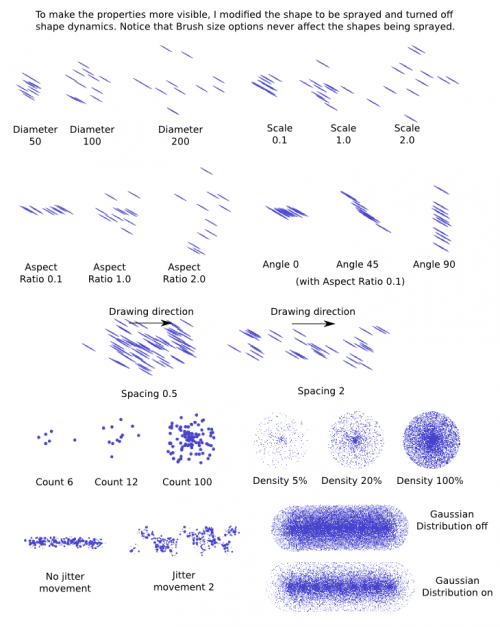
As said, all the options in the Brush Size tab control the placement of the shapes, though without changing the shapes themselves.
For starters, you have options that affect the spray area:
- : The diameter of the spray area.
- : The difference in width and height, so to say. Again, this does not affect the aspect ratio of the objects being sprayed.
- : The angle of the spray area, visible only if the Aspect Ratio is different from 1. This does not affect the angle of the objects being sprayed.
- : This value further multiplies the Diameter.
- : The spacing of the different spray instances.
Next you have two ways to control the amount of shapes being sprayed:
- : A fixed number of particles will be sprayed each instance. You may want to lower the default value when spraying large images.
- : The number of particles will be defined as density per area.
- Unlike with Count, you won't get fewer particles per unit of area when you increase the size of the spray area.
- Also use this with or .
Finally, you have two options:
- : This causes the spray area to get displaced while you draw.
- : This causes shapes to be more likely distributed near the center.
Shape dynamics
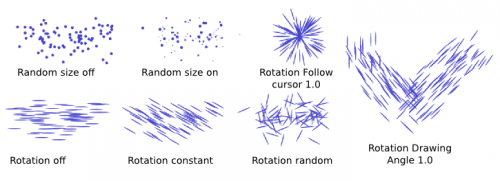
The options in the tab affect the shapes being sprayed. These options are:
- : This is on by default, and makes your shape vary in size. The maximum size is the regular size of the shape without this option on.
- : Although you can check several at a time, these options are mutually exclusive, so only one option will be chosen if you check several at a time. So, just check the one you actually want.
- : The shapes have a constant angle.
- : The shapes have a random angle.
- : At value 0, it doesn't do anything. At value 1.0, the shapes will all point towards the cursor.
- : The shapes will be oriented according to the direction of your drawing movement.
Color options
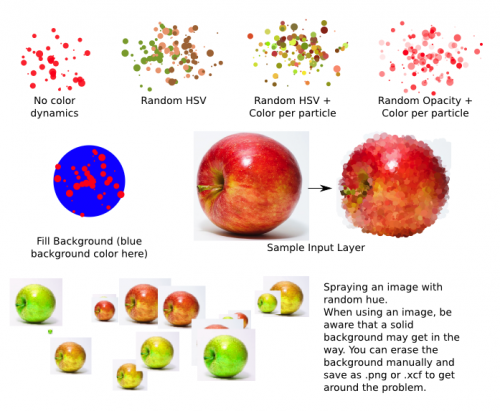
Finally, you have a tab. These are, in fact, the same options as with the grid brush:
- : The difference with the grid brush is that you can spray color images. In that case, the Hue, Saturation and Value values will change for the whole image.
- : This will cause each shape to vary in opacity.
- : Each shape sprayed will take on different colors.
- : The area behind the shapes will take on the background color.
- : This works the same as with the grid brush. Remember that the layer being sampled is the one that's active when the option is checked.
- : This is a tablet-only feature that mixes the particle color with the background color according to pressure.
If you need more explanations, you can scroll up and read the corresponding section in the Grid Brush tutorial again. They work the same. One thing to note, though, is that unlike with the pixel brush (as of the time of this writing), the HSV variations can work with color images.
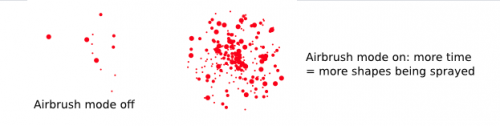
Airbrush
With this option on, the spray brush will continuously spray shapes onto a location even if you don't move your mouse or tablet.
Use cases
Apart from simple spraying, you can get a lot of effects from this brush! When using it with Predefined brush, it can also essentially serve as an alternative to a Pixel Brush with color, size and jitter dynamics. I won't cover that in-depth since there are too many options in that case.
A note on spraying images using Brush tips:
- Unlike with the current Pixel Brush, it's possible to take a color image (i.e. brush tip with multiple colors) and have them vary in Hue, Saturation and Value.
- For better quality, make a larger brush tip first, then go to Predefined Brushes and select your custom brush from the end of the list. You can scale from there. In older versions of Krita, you had to save your custom brush tip first before scaling, but it seems to be possible without saving with newer versions now.
- You can spray animated images with HSV variations this way!
I've already covered how to create custom brush tips in my Pixel Brush tutorial. It works exactly the same here, so please refer to that tutorial for how to create custom brush tips.
Experiment Brush
This brush can be used to create all sorts of weird shapes! LukasT has more on this brush.
Settings
The Experiment Brush doesn't have that many settings, and apart from dynamics, all of the options are in the tab.
However, you can generate a large variety of shapes from these options:
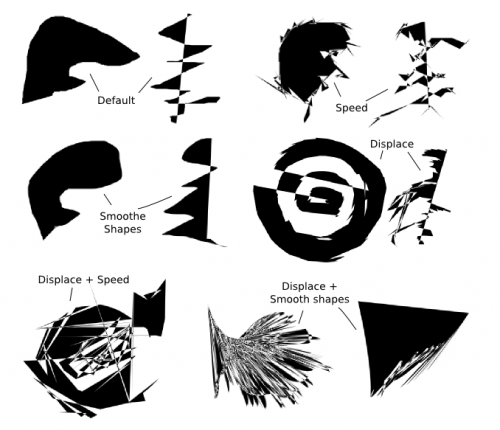
- : Increasing this will cause the shape output to have more jagged edges.
- : This smoothens the output somewhat. This is especially visible with Displace activated.
- : This is a strange one. This will cause you to grow or shrink your shape:
- Fast, abrupt movements will cause your shape to shrink, so don't wonder why your shape stays so small.
- Slower, gradual movements will cause the shape to slowly grow outwards.
- The larger the Displace value, the faster all this occurs, so for larger shapes, keep it at a relatively low value (like 10%). If you're just throwing shapes onto the canvas with fast movements though, you can set this higher.
There is just one dynamic: for . When you turn it on and set it to , for example, your shape will flicker as it changes in opacity while you draw. I find this a bit annoying so I prefer to just lower the overall opacity.
Use cases
You have at least two ways to use this "brush":
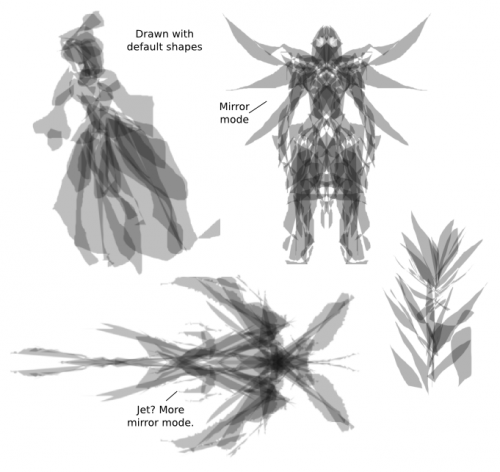
- You throw shapes randomly onto the canvas and try to see if they form anything interesting. Unless you have a really good imagination, they probably won't most of the time, so it's better to have a vague idea what you want ahead of time and try to at least get a general shape right.
- You treat this as a brush. Artist Deevad uses this. You draw small, more or less controlled shapes instead of messy big ones. The advantage of this "brush" over other brushes is that you're not limited by the brush shape, so you can get more interesting results.
Basically, it's usually best if you don't draw Too randomly, unless you're good at seeing images in all sorts of random patterns.
With this, this tutorial series has covered all of Krita's current painting brushes. The remaining brushes have more to do with editing and filters, which are domains I'm less familiar with. I'd like to thank the developers who answered the questions I've had on various functions, and who of course have brought us this great program. I hope you found this tutorial series useful. Enjoy painting! ![]()
how to change brush size in krita
Source: https://userbase.kde.org/Krita/Tutorial_8
Posted by: beadlewhoseeps.blogspot.com
0 Response to "how to change brush size in krita"
Post a Comment